-
[ React-Native ] setState를 이용해서 텍스트 변환 & 조건부 변환2021년 03월 07일 16시 57분 42초에 업로드 된 글입니다.작성자: Yanoo728x90반응형
첫 글을 작성했을 때 함수형 컴포넌트를 도전하려고 했으나 가지고 있는 책도 클래스형 컴포넌트고
함수형이 자료도 별로 없어서 클래스형으로 바꾸기로 했다...
과정은 나도 잘 모르는 것이므로 이론에 대해 조금 배우다가 어느 시점에 주제를 정하고 어떤 앱을 만들어볼 계획
일단 state와 props를 이해하는 것이 중요한듯한데, 공부하면서 배울 것,
그래도 책에서 중요하게 말하는 것은 state는 변경 가능하고, props는 변경 불가능하다고 한다.
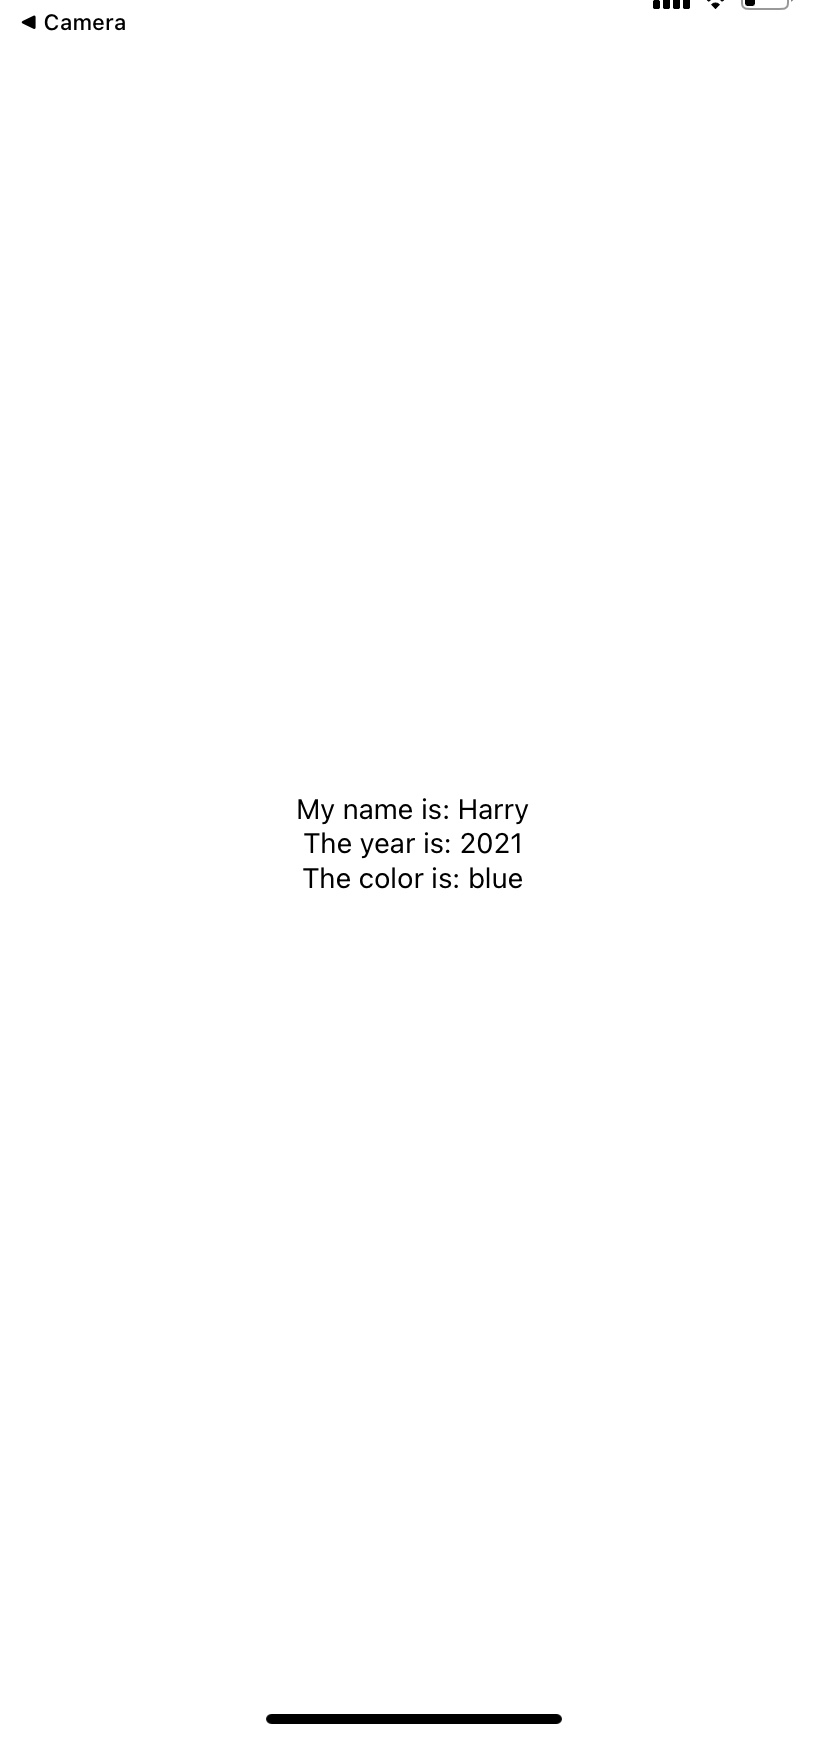
import React, {Component} from 'react';
import { StyleSheet, Text, View } from 'react-native';

class MyComponent extends Component {
  constructor(){
    super()
  this.state={
    year:2021,
    name:"Harry",
    colors:['blue'],
   }
  }


  render (){
    return(
    <View style={styles.container}>
      <Text>My name is: {this.state.name}</Text>
      <Text>The year is: {this.state.year}</Text>
      <Text>The color is: {this.state.colors[0]}</Text>
    </View>
    )
  }
}


export default MyComponent

const styles = StyleSheet.create({
  container: {
    flex: 1,
    backgroundColor: '#fff',
    alignItems: 'center',
    justifyContent: 'center',
  },
});
위 코드가 전 게시물을 클래스 컴포넌트형으로 바꾼 것이다.
export default MyComponent이 부분을 생략했을 때 안되는 것을 보니, default값으로 화면을 설정하는 것 같다.
그리고 화면상 This year is 부분을 클릭했을 때 2020으로 바꾸는 것을 진행할 것이다.
updateYear(){
    this.setState({
      year:2020
    })
  }
이 부분을 추가할 건데 setState가 호출될 때마다 리액트는 render를 다시 호출해서 컴포넌트와 자식 컴포넌트를 랜더링한다고 한다.
근데 처음에 초보자들이 많이 실수하는 부분이 있다고 하는데, 나도 처음에 같은 부분으로 틀렸다...
updateYear(){
    this.state.year=2020
  }
이것처럼 짜면 될 것 같지만 잘못된 방식이다. 이는 setState가 호출되지 않아서 컴포턴트가 다시 랜더링 되지 않았기 때문이라고 한다.
무튼 결과를 확인해보면


바뀐 것을 확인할 수 있다.
다음으로 Boolean을 이용한 조건부로 변환할 것인데,
이렇게 만들어져 있을때 아까처럼 year값이 바뀔때 Happy New year을 바꿀 것이다. 먼저 state 부분에 변수를 추가한다.
this.state={
    year:2021,
    name:"Harry",
    colors:['blue'],
    happy:false,
   }
happy라는 boolean 변수를 넣었다. 그리고 update Year부분에는
updateYear(){
    this.setState({
      year:2020,
      happy:true,
    })
  }
happy를 true로 바뀌도록 한다. 이제 마지막으로 랜더링 하는 부분인데,
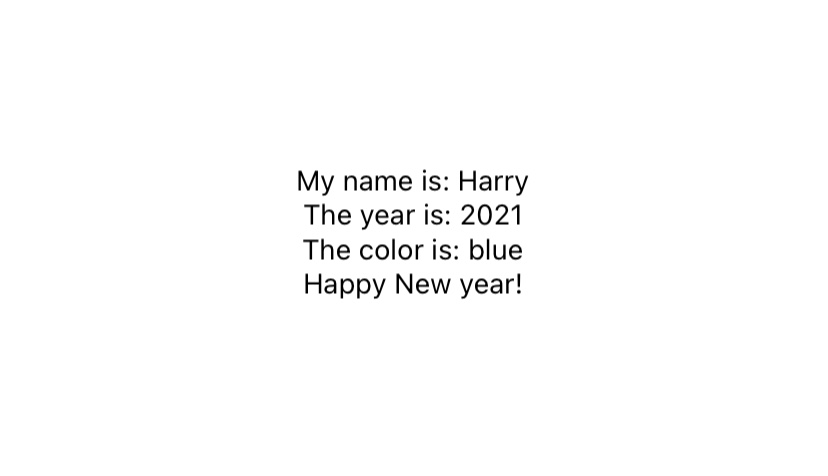
render (){
    let leapyear=<Text>Happy New year!</Text>
    if (this.state.happy){
      leapyear=<Text>Hello world</Text>
    }
    return(
    <View style={styles.container}>
      <Text>My name is: {this.state.name}</Text>
      <Text onPress={()=>this.updateYear()}>The year is: {this.state.year}</Text>
      <Text>The color is: {this.state.colors[0]}</Text>
      { leapyear }  // 삽입되는 부분
    </View>
    )
  }
코드를 읽어보면 기존에는 leapyear부분이 Happy New year이지만 year를 바꾸면서 updateYear()이 동작하게 된다 그러면서 happy를 true로 바꾸게 되고 leapyear는 Hello world로 바뀌게 된다.
그리고 결과를 확인해보면, The year is 부분을 클릭했을 때

2020으로 바뀌는 동기에 Hello world로 바뀌는 것을 알 수 있다.
전체 코드
import React, {Component} from 'react'; import { StyleSheet, Text, View } from 'react-native'; class MyComponent extends Component { constructor(){ super() this.state={ year:2021, name:"Harry", colors:['blue'], happy:false, } } updateYear(){ this.setState({ year:2020, happy:true, }) } render (){ let leapyear=<Text>Happy New year!</Text> if (this.state.happy){ leapyear=<Text>Hello world</Text> } return( <View style={styles.container}> <Text>My name is: {this.state.name}</Text> <Text onPress={()=>this.updateYear()}>The year is: {this.state.year}</Text> <Text>The color is: {this.state.colors[0]}</Text> { leapyear } </View> ) } } export default MyComponent const styles = StyleSheet.create({ container: { flex: 1, backgroundColor: '#fff', alignItems: 'center', justifyContent: 'center', }, });728x90반응형'프로그래밍 > React-Native' 카테고리의 다른 글
잠시 멈춤 (2) 2021.03.28 [ React-Native ] 생명주기 메서드 (0) 2021.03.22 [ React-Native ] Props ( state와의 차이) (0) 2021.03.14 [ React-Native ] expo를 이용한 프로젝트 생성 (0) 2021.02.16 댓글